LNNVL函数使用

LNNVL官方解释
LNNVL provides a concise way to evaluate a condition when one or both operands of the condition may be null. The function can be used only in the WHERE clause of a query. It takes as an argument a condition and returns TRUE if the condition is FALSE or UNKNOWN and FALSE if the condition is TRUE. LNNVL can be used anywhere a scalar expression can appear, even in contexts where the IS [NOT] NULL, AND, or OR conditions are not valid but would otherwise be required to account for potential nulls. Oracle Database sometimes uses the LNNVL function internally in this way to rewrite NOT IN conditions as NOT EXISTS conditions. In such cases, output from EXPLAIN PLAN shows this operation in the plan table output. The condition can evaluate any scalar values but cannot be a compound condition containing AND, OR, or BETWEEN.

LNNVL官方解释翻译
lnnvl用于某个语句的where子句中的条件,如果条件为true就返回false;如果条件为UNKNOWN或者false就返回true。该函数不能用于复合条件如AND, OR, or BETWEEN中。

模拟测试环境

SQL> create table xifenfei(name varchar2(20),year number);

Table created.

SQL> insert into xifenfei values('xifenfei2001',2001);

1 row created.

SQL> insert into xifenfei values('xifenfei2002',2002);

1 row created.

SQL> insert into xifenfei values('xifenfei2003',2003);

1 row created.

SQL> insert into xifenfei values('xifenfei2004',2004);

1 row created.

SQL> insert into xifenfei values('xifenfei2005',2005);

1 row created.

SQL> insert into xifenfei values('xifenfei2006',2006);

1 row created.

SQL> insert into xifenfei values('xifenfei2007',2007);

1 row created.

SQL> insert into xifenfei values('xifenfei2008',null);

1 row created.

SQL> insert into xifenfei values('xifenfei2009',2009);

1 row created.

SQL> insert into xifenfei values('xifenfei2010',2010);

1 row created.

SQL> insert into xifenfei values('xifenfei2011',2011);

1 row created.

SQL> commit;

Commit complete.

SQL> select * from xifenfei;

NAME                       YEAR
-------------------- ----------
xifenfei2001               2001
xifenfei2002               2002
xifenfei2003               2003
xifenfei2004               2004
xifenfei2005               2005
xifenfei2006               2006
xifenfei2007               2007
xifenfei2008
xifenfei2009               2009
xifenfei2010               2010
xifenfei2011               2011

11 rows selected.

几种情况测试说明

--年份小于2009(lnnvl表示年份大于或者2009包含null)
SQL> select * from xifenfei where lnnvl(year<2009);

NAME                       YEAR
-------------------- ----------
xifenfei2008
xifenfei2009               2009
xifenfei2010               2010
xifenfei2011               2011

--year不为null(lnnvl表示年份为null)
SQL> select * from xifenfei where lnnvl(year is not null);

NAME                       YEAR
-------------------- ----------
xifenfei2008

--年份为null(lnnvl表示年份不为null)
SQL> select * from xifenfei where lnnvl(year is  null);

NAME                       YEAR
-------------------- ----------
xifenfei2001               2001
xifenfei2002               2002
xifenfei2003               2003
xifenfei2004               2004
xifenfei2005               2005
xifenfei2006               2006
xifenfei2007               2007
xifenfei2009               2009
xifenfei2010               2010
xifenfei2011               2011

10 rows selected.

--年份为12345(lnnvl表示年份不为12345)
SQL> select * from xifenfei where lnnvl(year =12345);

NAME                       YEAR
-------------------- ----------
xifenfei2001               2001
xifenfei2002               2002
xifenfei2003               2003
xifenfei2004               2004
xifenfei2005               2005
xifenfei2006               2006
xifenfei2007               2007
xifenfei2008
xifenfei2009               2009
xifenfei2010               2010
xifenfei2011               2011

11 rows selected.

--年份不为12345(lnnvl表示年份为12345或者null)
SQL> select * from xifenfei where lnnvl(year !=12345);

NAME                       YEAR
-------------------- ----------
xifenfei2008

Configuring an active standby pair with one subscriber

Step 1: Create the DSNs for the master and the subscriber databases

[master1]
DRIVER=/u01/TimesTen/tt1122/lib/libtten.so
DataStore=/u01/TimesTen/replicate//master1
DatabaseCharacterSet=ZHS16GBK
ConnectionCharacterSet=ZHS16GBK
PermSize=64

[master2]
DRIVER=/u01/TimesTen/tt1122/lib/libtten.so
DataStore=/u01/TimesTen/replicate//master2
DatabaseCharacterSet=ZHS16GBK
ConnectionCharacterSet=ZHS16GBK
PermSize=64

[subscriber1]
DRIVER=/u01/TimesTen/tt1122/lib/libtten.so
DataStore=/u01/TimesTen/replicate/subscriber1
DatabaseCharacterSet=ZHS16GBK
ConnectionCharacterSet=ZHS16GBK
PermSize=64

Step 2: Create a table in one of the master databases

[oracle@xifenfei info]$ ttIsql master1

Copyright (c) 1996-2011, Oracle.  All rights reserved.
Type ? or "help" for help, type "exit" to quit ttIsql.


connect "DSN=master1";
Connection successful: DSN=master1;UID=oracle;DataStore=/u01/TimesTen/replicate//master1;DatabaseCharacterSet=ZHS16GBK;ConnectionCharacterSet=ZHS16GBK;DRIVER=/u01/TimesTen/tt1122/lib/libtten.so;PermSize=64;TypeMode=0;
(Default setting AutoCommit=1)
Command>  CREATE TABLE tab (a NUMBER NOT NULL,
       >    b CHAR(18),
       >    PRIMARY KEY (a));

Step 3: Define the active standby pair

Command>  CREATE ACTIVE STANDBY PAIR master1, master2
       >    SUBSCRIBER subscriber1;

Step 4: Start the replication agent on a master database

Command>  CALL ttRepStart;

Step 5: Set the state of a master database to ‘ACTIVE’

Command>  CALL ttRepStateSet('ACTIVE');

Step 6. Create a user on the active database

Command> CREATE USER terry IDENTIFIED BY terry;

User created.

Command>  GRANT admin TO terry;

Step 7: Duplicate the active database to the standby database

[oracle@xifenfei info]$ ttRepAdmin -duplicate -from master1 -host xifenfei -uid terry -pwd terry  "dsn=master2"

Step 8: Start the replication agent on the standby database

[oracle@xifenfei info]$ ttIsql master2

Copyright (c) 1996-2011, Oracle.  All rights reserved.
Type ? or "help" for help, type "exit" to quit ttIsql.


connect "DSN=master2";
Connection successful: DSN=master2;UID=oracle;DataStore=/u01/TimesTen/replicate//master2;DatabaseCharacterSet=ZHS16GBK;ConnectionCharacterSet=ZHS16GBK;DRIVER=/u01/TimesTen/tt1122/lib/libtten.so;PermSize=64;TypeMode=0;
(Default setting AutoCommit=1)
Command>  CALL ttRepStart;

Step 9. Duplicate the standby database to the subscriber

[oracle@xifenfei info]$ ttRepAdmin -duplicate -from master2 -host xifenfei -uid terry -pwd terry  "dsn=subscriber1"

Step 10: Start the replication agent on the subscriber

[oracle@xifenfei info]$ ttIsql subscriber1

Copyright (c) 1996-2011, Oracle.  All rights reserved.
Type ? or "help" for help, type "exit" to quit ttIsql.


connect "DSN=subscriber1";
Connection successful: DSN=subscriber1;UID=oracle;DataStore=/u01/TimesTen/replicate/subscriber1;DatabaseCharacterSet=ZHS16GBK;ConnectionCharacterSet=ZHS16GBK;DRIVER=/u01/TimesTen/tt1122/lib/libtten.so;PermSize=64;TypeMode=0;
(Default setting AutoCommit=1)
Command>  CALL ttRepStart;

Step 11: Insert data into the table on the active database

[oracle@xifenfei info]$ ttIsql master1

Copyright (c) 1996-2011, Oracle.  All rights reserved.
Type ? or "help" for help, type "exit" to quit ttIsql.


connect "DSN=master1";
Connection successful: DSN=master1;UID=oracle;DataStore=/u01/TimesTen/replicate//master1;DatabaseCharacterSet=ZHS16GBK;ConnectionCharacterSet=ZHS16GBK;DRIVER=/u01/TimesTen/tt1122/lib/libtten.so;PermSize=64;TypeMode=0;
(Default setting AutoCommit=1)
Command> INSERT INTO tab VALUES (1,'Hello');
1 row inserted.
Command> commit;

Setp 12:Verify that the insert is replicated to master2 and subscriber1

[oracle@xifenfei info]$ ttIsql master2

Copyright (c) 1996-2011, Oracle.  All rights reserved.
Type ? or "help" for help, type "exit" to quit ttIsql.


connect "DSN=master2";
Connection successful: DSN=master2;UID=oracle;DataStore=/u01/TimesTen/replicate//master2;DatabaseCharacterSet=ZHS16GBK;ConnectionCharacterSet=ZHS16GBK;DRIVER=/u01/TimesTen/tt1122/lib/libtten.so;PermSize=64;TypeMode=0;
(Default setting AutoCommit=1)
Command> select * from tab;
< 1, Hello              >
1 row found.
Command> exit
Disconnecting...
Done.
[oracle@xifenfei info]$ ttIsql subscriber1

Copyright (c) 1996-2011, Oracle.  All rights reserved.
Type ? or "help" for help, type "exit" to quit ttIsql.


connect "DSN=subscriber1";
Connection successful: DSN=subscriber1;UID=oracle;DataStore=/u01/TimesTen/replicate/subscriber1;DatabaseCharacterSet=ZHS16GBK;ConnectionCharacterSet=ZHS16GBK;DRIVER=/u01/TimesTen/tt1122/lib/libtten.so;PermSize=64;TypeMode=0;
(Default setting AutoCommit=1)
Command> select * from tab;
< 1, Hello              >
1 row found.

Configuring an active standby pair with one subscriber

tempfile真正文件号

1.发现问题
这里看到文件号为201,但是查询了v$datafile和v$tempfile视图都没有文件号为201

SQL> select username,segtype,segfile#,segblk#,extents,segrfno# from v$sort_usage;

USERN SEGTYPE     SEGFILE#    SEGBLK#    EXTENTS   SEGRFNO#
----- --------- ---------- ---------- ---------- ----------
SYS   SORT             201     260745        650          1

SEGFILE#  NUMBER  File number of initial extent 

SEGRFNO#   NUMBER  Relative file number of initial extent 

SQL> SELECT FILE#,RFILE# FROM V$DATAFILE;

     FILE#     RFILE#
---------- ----------
         1          1
         2          2
         3          3
         4          4
         5          5
         6          6
         7          7
         8          8
         9          9
        10         10
        11         11

     FILE#     RFILE#
---------- ----------
        13         13
        14         14

13 rows selected.

SQL> SELECT FILE#,RFILE# FROM V$TEMPFILE;

     FILE#     RFILE#
---------- ----------
         1          1

2.查看v$sort_usage的原始表

SELECT USERNAME,
       USERNAME,
       KTSSOSES,
       KTSSOSNO,
       PREV_SQL_ADDR,
       PREV_HASH_VALUE,
       PREV_SQL_ID,
       KTSSOTSN,
       DECODE(KTSSOCNT, 0, 'PERMANENT', 1, 'TEMPORARY'),
       DECODE(KTSSOSEGT,
              1,
              'SORT',
              2,
              'HASH',
              3,
              'DATA',
              4,
              'INDEX',
              5,
              'LOB_DATA',
              6,
              'LOB_INDEX',
              'UNDEFINED'),
       KTSSOFNO,
       KTSSOBNO,
       KTSSOEXTS,
       KTSSOBLKS,
       KTSSORFNO
  FROM X$KTSSO, V$SESSION
 WHERE KTSSOSES = V$SESSION.SADDR
   AND KTSSOSNO = V$SESSION.SERIAL#
   and inst_id = USERENV('Instance')

这里没有发现有用信息,只是知道X$KTSSO.KTSSOFNO是v$sort_usage.SEGFILE#,通过v$sort_usage视图是查询临时表空用来排序的数据文件使用情况。所以把问题定位在v$tempfile视图中,检查它为什么没有显示文件号为201的文件

3.查看v$tempfile视图

SELECT TF.TFNUM,
       TO_NUMBER(TF.TFCRC_SCN),
       TO_DATE(TF.TFCRC_TIM,
               'MM/DD/RR HH24:MI:SS',
               'NLS_CALENDAR=Gregorian'),
       TF.TFTSN,
       TF.TFRFN,
       DECODE(BITAND(TF.TFSTA, 2), 0, 'OFFLINE', 2, 'ONLINE', 'UNKNOWN'),
       DECODE(BITAND(TF.TFSTA, 12),
              0,
              'DISABLED',
              4,
              'READ ONLY',
              12,
              'READ WRITE',
              'UNKNOWN'),
       FH.FHTMPFSZ * TF.TFBSZ,
       FH.FHTMPFSZ,
       TF.TFCSZ * TF.TFBSZ,
       TF.TFBSZ,
       FN.FNNAM
  FROM X$KCCTF TF, X$KCCFN FN, X$KCVFHTMP FH
 WHERE FN.FNFNO = TF.TFNUM
   AND FN.FNFNO = FH.HTMPXFIL
   AND TF.TFFNH = FN.FNNUM
   AND TF.TFDUP != 0
   AND BITAND(TF.TFSTA, 32) <> 32
   AND FN.FNTYP = 7
   AND FN.FNNAM IS NOT NULL
   and inst_id = USERENV('Instance')

从这里可以看出v$tempfile.file#出自X$KCCTF.TFNUM

4.继续查看X$KCCTF表

SQL> desc X$KCCTF
 Name                                      Null?    Type
 ----------------------------------------- -------- -------------
 ADDR                                               RAW(8)
 INDX                                               NUMBER
 INST_ID                                            NUMBER
 TFNUM                                              NUMBER
 TFAFN                                              NUMBER
 TFCSZ                                              NUMBER
 TFBSZ                                              NUMBER
 TFSTA                                              NUMBER
 TFCRC_SCN                                          VARCHAR2(16)
 TFCRC_TIM                                          VARCHAR2(20)
 TFFNH                                              NUMBER
 TFFNT                                              NUMBER
 TFDUP                                              NUMBER
 TFTSN                                              NUMBER
 TFTSI                                              NUMBER
 TFRFN                                              NUMBER
 TFPFT                                              NUMBER
 TFMSZ                                              NUMBER
 TFNSZ                                              NUMBER

这里发现一列TFAFN,初步怀疑这个才是真正的绝对文件号。

5.证明X$KCCTF.TFAFN是绝对文件号

SQL> select TFAFN,TFNUM from X$KCCTF;

     TFAFN      TFNUM
---------- ----------
       201          1

如果证明X$KCCTF.TFAFN才是真正的文件号,而TFNUM是临时文件的文件号

6.temp file绝对文件号结论
再进一步可以知道,实际上,为了分离临时文件号和数据文件号,Oracle对临时文件的编号以db_files为起点,所以临时文件的绝对文件号应该等于db_files+file#。

SQL> show parameter db_files;

NAME                                 TYPE        VALUE
------------------------------------ ----------- --------
db_files                             integer     200

记录oracle 9i for linux安装过程中几个错误

最近因为一个测试环境需要oracle 9i,我在Oracle linux 4.8上安装,竟然遇到几个问题记录下:
1.运行runInstaller提示如下错误

[oracle@xifenfei Disk1]$ ./runInstaller 
[oracle@xifenfei Disk1]$ Initializing Java Virtual Machine from /tmp/OraInstall2012-03-04_09-32-16PM/jre/bin/java. Please wait...
Error occurred during initialization of VM
Unable to load native library: /tmp/OraInstall2012-03-04_09-32-16PM/jre/lib/i386/libjava.so: 
symbol __libc_wait, version GLIBC_2.0 not defined in file libc.so.6 with link time reference

解决方法:打上p3006854_9204_LINUX.zip补丁

[root@xifenfei tmp]$ unzip p3006854_9204_LINUX.zip 
Archive:  p3006854_9204_LINUX.zip
   creating: 3006854/
  inflating: 3006854/rhel3_pre_install.sh  
  inflating: 3006854/README.txt 
[root@xifenfei 3006854]# cd 3006854
[root@xifenfei 3006854]# chmod +x rhel3_pre_install.sh 
[root@xifenfei 3006854]# ./rhel3_pre_install.sh 
Applying patch...
Ensuring permissions are correctly set...
Done.
Patch successfully applied

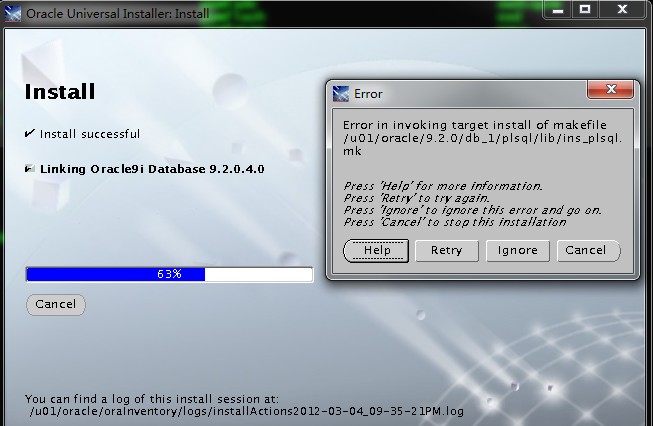
2.在Linking Oracle9i到63%时入到如下错误

解决办法:在/usr/bin目录下有gcc 和 gcc32两个文件,执行 mv gcc gcc296 和 mv gcc32 gcc,完成之后,retry安装界面

[root@xifenfei tmp]# cd /usr/bin
[root@xifenfei bin]# ls gcc*
gcc  gcc32  gcc4
[root@xifenfei bin]# mv gcc gcc296
[root@xifenfei bin]# mv gcc32 gcc

3.执行netca/dbca报如下错误

[oracle@xifenfei Disk1]$ dbca
/u01/oracle/jre/1.1.8/bin/../lib/i686/green_threads/libzip.so: symbol errno, 
version GLIBC_2.0 not defined in file libc.so.6 with link time reference (libzip.so)
Unable to initialize threads: cannot find class java/lang/Thread
Could not create Java VM
[oracle@xifenfei Disk1]$ netca
/u01/oracle/jre/1.1.8/bin/../lib/i686/native_threads/libzip.so: symbol errno, 
version GLIBC_2.0 not defined in file libc.so.6 with link time reference (libzip.so)
Unable to initialize threads: cannot find class java/lang/Thread
Could not create Java VM

解决办法:在环境变量中加上LD_ASSUME_KERNEL=2.4.1

vi .bash_profile --加上下面语句
export LD_ASSUME_KERNEL=2.4.1
source ~/.bash_profile

利用oradebug释放被删除文件空间

在很多时候,检查系统时候发现,由于某个Oracle的trace文件导致磁盘空间告警,因为业务需要不能让数据库down下来。这个时候你想到的方法可能是直接删除掉这个trace文件,如果是win系统,那恭喜你这样做可以解决问题;如果是linux/unix系统,那就等着事故的发生吧。在linux/unix中,如果直接rm掉oracle进程的某个文件(该进程还存在),文件句柄不会释放,即磁盘使用空间不会释放。可以通过df命名看到磁盘的空间释放释放。下面通过对lgwr进程的一系列操作,使用oradebug来释放oracle进程句柄,从而达到释放oracle某个被删除的trace文件的磁盘空间
一、查找lgwr进程的trace文件

[oracle@localhost /]$ cd $ORACLE_BASE/admin/$ORACLE_SID/bdump
[oracle@localhost bdump]$ pwd
/opt/oracle/admin/mcrm/bdump
[oracle@localhost bdump]$ ls -l|grep lgwr
-rw-r----- 1 oracle oinstall 32133 Dec 22 21:00 mcrm_lgwr_3485.trc
-rw-r----- 1 oracle oinstall  3713 Oct  8 07:13 mcrm_lgwr_3489.trc
-rw-r----- 1 oracle oinstall 22507 Mar  3 06:00 mcrm_lgwr_3598.trc
-rw-r----- 1 oracle oinstall  8441 Sep 15 10:29 mcrm_lgwr_4963.trc
[oracle@localhost bdump]$ ps -ef|grep lgwr
oracle    1056 30718  0 21:10 pts/3    00:00:00 grep lgwr
oracle    3598     1  0  2011 ?        00:04:10 ora_lgwr_mcrm
[oracle@localhost bdump]$ df |grep /opt
/dev/sda6             37798668  33312588   2534988  93% /opt
[oracle@localhost bdump]$ du -s .
948     .

从这里得出几点结论:
1.当前lgwr进程的spid为:3598
2.当前lgwr进程产生的trace文件大小为:22507B
3.包含该trace文件的分区大小使用大小为:33312588KB
4.bdump目录大小为:948KB

二、删除lgwr进程对应trace文件

[oracle@localhost bdump]$ rm mcrm_lgwr_3598.trc
[oracle@localhost bdump]$ du -s .
924     .
[oracle@localhost bdump]$ df |grep /opt
/dev/sda6             37798668  33312588   2534988  93% /opt

[oracle@localhost bdump]$ ls -l /proc/3598/fd|grep lgwr   
l-wx------ 1 oracle oinstall 64 Mar  3 20:54 2 -> /opt/oracle/admin/mcrm/bdump/mcrm_lgwr_3598.trc (deleted)

从这里得出结论:
1.bdump目录当前大小变为:924KB(大约等于948KB-22507B)
2.包含该trace文件的分区大小使用大小依然为:33312588KB(没有因为删除trace文件而释放空间)

三、释放被删除trace文件空间

[oracle@localhost bdump]$ sqlplus / as sysdba

SQL*Plus: Release 10.2.0.4.0 - Production on Sat Mar 3 21:12:41 2012

Copyright (c) 1982, 2007, Oracle.  All Rights Reserved.


Connected to:
Oracle Database 10g Enterprise Edition Release 10.2.0.4.0 - 64bit Production
With the Partitioning, OLAP, Data Mining and Real Application Testing options

SQL> !ls -l /proc/3598/fd|grep lgwr  
l-wx------ 1 oracle oinstall 64 Mar  3 20:54 2 -> /opt/oracle/admin/mcrm/bdump/mcrm_lgwr_3598.trc (deleted)

SQL>  oradebug setospid 3598
Oracle pid: 6, Unix process pid: 3598, image: oracle@localhost.localdomain (LGWR)
SQL> oradebug flush;    
Statement processed.
SQL> oradebug close_trace;
Statement processed.
SQL> !ls -l /proc/3598/fd|grep lgwr  

SQL> !df |grep /opt
/dev/sda6             37798668  33312564   2535012  93% /opt

SQL> exit
Disconnected from Oracle Database 10g Enterprise Edition Release 10.2.0.4.0 - 64bit Production
With the Partitioning, OLAP, Data Mining and Real Application Testing options

从这里可以得出结论:
1.包含该trace文件的分区大小使用大小为:33312564KB(大约等于948KB-22507B)
2./proc/spid/fd下面的句柄已经释放
3.总这里可以看出使用oradebug可以真正释放oracle进程磁盘使用空间