ORACLE 12C已经发布了十多天,其中一个亮点就是pdb,而在12C之前的数据库没有pdb之说,也就是说如果要把以前的数据库升级到12C,并且想让该库变成一个pdb,那所要做的工作就是先需要升级数据库从12C之前版本升级到12C,然后把一个NO-CDB数据库PLUG到CDB中.本blog演示:在前段时间意外的释放出来ORACLE 11.2.0.4版本,利用该版本升级到12.1.0.1,并插入到一个cdb库中
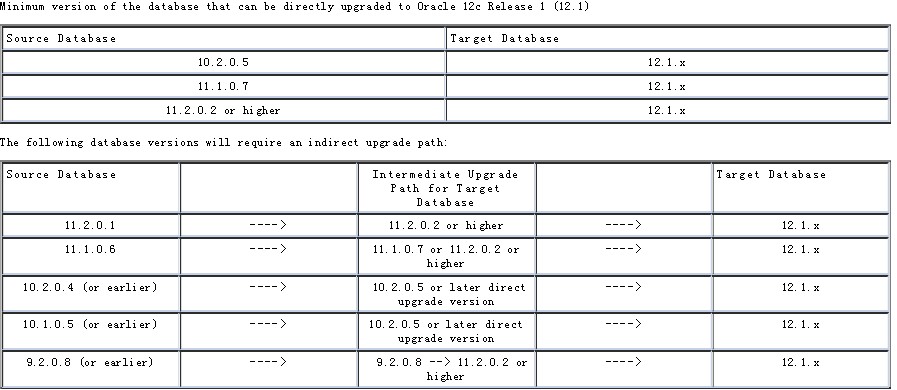
ORACLE 12C升级版本要求
11.2.0.4到12.1.0.1升级操作操作[升级整体参考文档1503653.1]
当前相关组件版本信息
SQL> select * from v$version;

BANNER
--------------------------------------------------------------------------------
Oracle Database 11g Enterprise Edition Release 11.2.0.4.0 - 64bit Production
PL/SQL Release 11.2.0.4.0 - Production
CORE    11.2.0.4.0      Production
TNS for Linux: Version 11.2.0.4.0 - Production
NLSRTL Version 11.2.0.4.0 - Production

SQL> show parameter name;

NAME                                 TYPE        VALUE
------------------------------------ ----------- ------------------------------
cell_offloadgroup_name               string
db_file_name_convert                 string
db_name                              string      ora11g
db_unique_name                       string      ora11g
global_names                         boolean     FALSE
instance_name                        string      ora11g
lock_name_space                      string
log_file_name_convert                string
processor_group_name                 string
service_names                        string      ora11g

SQL> select COMP_NAME,VERSION,STATUS from dba_registry;

COMP_NAME                                VERSION                        STATUS
---------------------------------------- ------------------------------ ----------------------
OWB                                      11.2.0.4.0                     VALID
Oracle Application Express               3.2.1.00.12                    VALID
Spatial                                  11.2.0.4.0                     VALID
Oracle Multimedia                        11.2.0.4.0                     VALID
Oracle XML Database                      11.2.0.4.0                     VALID
Oracle Text                              11.2.0.4.0                     VALID
Oracle Expression Filter                 11.2.0.4.0                     VALID
Oracle Rules Manager                     11.2.0.4.0                     VALID
Oracle Workspace Manager                 11.2.0.4.0                     VALID
Oracle Database Catalog Views            11.2.0.4.0                     VALID
Oracle Database Packages and Types       11.2.0.4.0                     VALID
JServer JAVA Virtual Machine             11.2.0.4.0                     VALID
Oracle XDK                               11.2.0.4.0                     VALID
Oracle Database Java Packages            11.2.0.4.0                     VALID
OLAP Analytic Workspace                  11.2.0.4.0                     VALID
Oracle OLAP API                          11.2.0.4.0                     VALID

16 rows selected.
升级准备工作
执行Pre-Upgrade Utility,具体参考Note 884522.1 How to Download and Run Oracle’s Database Pre-Upgrade Utility
SQL> @/tmp/preupgrd.sql
Loading Pre-Upgrade Package...
Executing Pre-Upgrade Checks...
Pre-Upgrade Checks Complete.
      ************************************************************

Results of the checks are located at:
 /u02/app/oracle/cfgtoollogs/ora11g/preupgrade/preupgrade.log

Pre-Upgrade Fixup Script (run in source database environment):
 /u02/app/oracle/cfgtoollogs/ora11g/preupgrade/preupgrade_fixups.sql

Post-Upgrade Fixup Script (run shortly after upgrade):
 /u02/app/oracle/cfgtoollogs/ora11g/preupgrade/postupgrade_fixups.sql

      ************************************************************

         Fixup scripts must be reviewed prior to being executed.

      ************************************************************

      ************************************************************
                   ====>> USER ACTION REQUIRED  <<====
      ************************************************************

 The following are *** ERROR LEVEL CONDITIONS *** that must be addressed
                    prior to attempting your upgrade.
            Failure to do so will result in a failed upgrade.

           You MUST resolve the above errors prior to upgrade

      ************************************************************
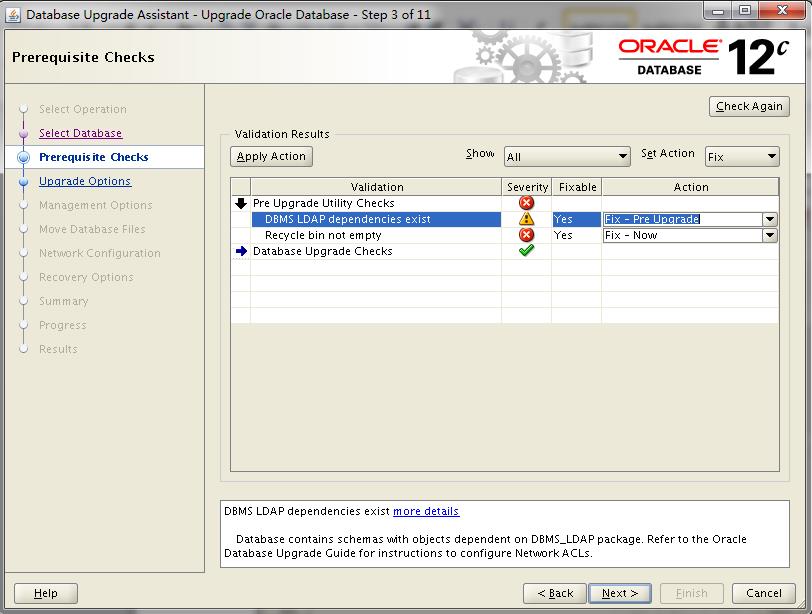
这里发生了改变,在12C之前版本直接显示需要修改的相关操作,12C把相关操作封装到了preupgrade_fixups.sql脚本,执行该脚本按照提示修复问题.
这里主要以下问题需要解决
ALTER SYSTEM SET PROCESSES=300 SCOPE=SPFILE;
@/u01/app/oracle/product/12.1/db_1/rdbms/admin/emremove.sql
@/u02/app/oracle/product/11.2/db_1/olap/admin/catnoamd.sql
EXECUTE dbms_stats.gather_dictionary_stats;
执行dbupgdiag.sql收集升级前信息
如果有异常核对相应的MOS文章修改,具体见Script to Collect DB Upgrade/Migrate Diagnostic Information (dbupgdiag.sql) [ID 556610.1]
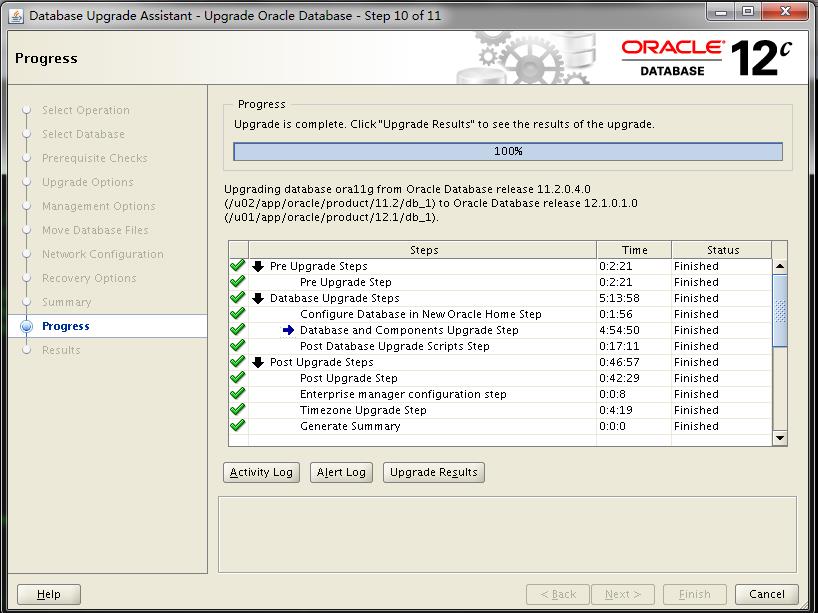
dbua升级数据库
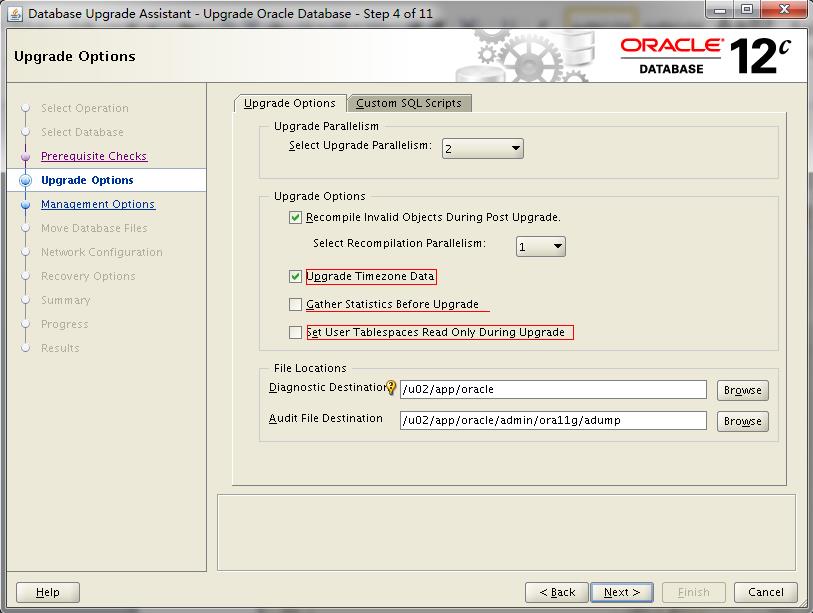
12C的dbua发生了不上变化,因为都是图形化界面,不做过多描述,贴上几幅区别较大图进行说明,关于12C的dbua变化更加详细信息请参考:Complete Checklist to Upgrade the Database to 12c Release 1 using DBUA [ID 1516557.1]
升级后检查
执行postupgrade_fixups.sql脚本查看确定需要升级后处理事宜,因为是dbua升级数据库,很多问题已经自动修复,无需人工再次干预,例如timezone(14–>18)
SQL> select * from v$version;

BANNER                                                                               CON_ID
-------------------------------------------------------------------------------- ----------
Oracle Database 12c Enterprise Edition Release 12.1.0.1.0 - 64bit Production              0
PL/SQL Release 12.1.0.1.0 - Production                                                    0
CORE    12.1.0.1.0      Production                                                        0
TNS for Linux: Version 12.1.0.1.0 - Production                                            0
NLSRTL Version 12.1.0.1.0 - Production                                                    0

SQL> select COMP_NAME,VERSION,STATUS from dba_registry;

COMP_NAME                                     VERSION                        STATUS
--------------------------------------------- ------------------------------ ----------------------
Oracle Application Express                    4.2.0.00.27                    VALID
OWB                                           11.2.0.4.0                     VALID
Spatial                                       12.1.0.1.0                     VALID
Oracle Multimedia                             12.1.0.1.0                     VALID
Oracle XML Database                           12.1.0.1.0                     VALID
Oracle Text                                   12.1.0.1.0                     VALID
Oracle Workspace Manager                      12.1.0.1.0                     VALID
Oracle Database Catalog Views                 12.1.0.1.0                     VALID
Oracle Database Packages and Types            12.1.0.1.0                     VALID
JServer JAVA Virtual Machine                  12.1.0.1.0                     VALID
Oracle XDK                                    12.1.0.1.0                     VALID
Oracle Database Java Packages                 12.1.0.1.0                     VALID
OLAP Analytic Workspace                       12.1.0.1.0                     VALID
Oracle OLAP API                               12.1.0.1.0                     VALID

14 rows selected.
升级前后oratab信息对比
dbua使用12C环境变量shell下执行,注意不要人工修改oratab记录,执行完会自动修改
--升级前
[oracle@xifenfei ~]$ grep ora11g /etc/oratab
ora11g:/u02/app/oracle/product/11.2/db_1:N:             # line added by Agent

--升级后
[oracle@xifenfei ~]$ grep ora11g /etc/oratab
ora11g:/u01/app/oracle/product/12.1/db_1:N:             # line added by Agent
到此,我们可以确定11.2.0.4已经顺利升级到12.1.0.1,升级过程比较顺利,但是升级时间比较长,很可能和我的机器配置有关
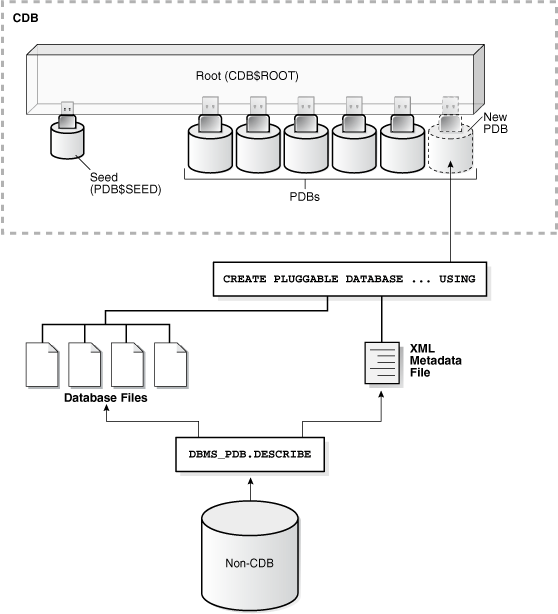
NO-CDB PLUG CDB
把11.2.0.4升级到12.1.0.1的数据库插入到一个CDB数据库中,让其成为CDB一部分
PLUG操作示意图
升级后数据库信息
SQL>  select cdb,NAME,dbid from v$database;

CDB NAME            DBID
--- --------- ----------
NO  ORA11G    4215674657

SQL> select * from v$version;

BANNER                                                                               CON_ID
-------------------------------------------------------------------------------- ----------
Oracle Database 12c Enterprise Edition Release 12.1.0.1.0 - 64bit Production              0
PL/SQL Release 12.1.0.1.0 - Production                                                    0
CORE    12.1.0.1.0      Production                                                        0
TNS for Linux: Version 12.1.0.1.0 - Production                                            0
NLSRTL Version 12.1.0.1.0 - Production                                                    0
创建XML元数据文件
SQL> shutdown immediate
Database closed.
Database dismounted.
ORACLE instance shut down.
SQL> startup mount;
ORACLE instance started.

Total System Global Area  801701888 bytes
Fixed Size                  2293496 bytes
Variable Size             314573064 bytes
Database Buffers          478150656 bytes
Redo Buffers                6684672 bytes
Database mounted.
SQL> alter database open read only;

Database altered.

SQL> EXEC DBMS_PDB.DESCRIBE( pdb_descr_file => '/tmp/ora11g.xml');

PL/SQL procedure successfully completed.

SQL> shutdown immediate
Database closed.
Database dismounted.
ORACLE instance shut down.
CDB数据库信息
SQL> select * from v$version;

BANNER                                                                               CON_ID
-------------------------------------------------------------------------------- ----------
Oracle Database 12c Enterprise Edition Release 12.1.0.1.0 - 64bit Production              0
PL/SQL Release 12.1.0.1.0 - Production                                                    0
CORE    12.1.0.1.0      Production                                                        0
TNS for Linux: Version 12.1.0.1.0 - Production                                            0
NLSRTL Version 12.1.0.1.0 - Production                                                    0

SQL> show pdbs;

    CON_ID CON_NAME                       OPEN MODE  RESTRICTED
---------- ------------------------------ ---------- ----------
         2 PDB$SEED                       READ ONLY  NO
         3 PDB1                           MOUNTED
         4 PDB2                           MOUNTED
检查升级后数据库是否适合插入到该cdb
SQL> set serveroutput on;
 declare
         compat boolean := FALSE;
    begin
       compat := dbms_pdb.check_plug_compatibility(pdb_descr_file => '/tmp/ora11g.xml');
        if compat
        then
               dbms_output.put_line('Yes');
       else
               dbms_output.put_line('No');
      end if;
   end;SQL>   2    3    4    5    6    7    8    9   10   11
 12  /
No

PL/SQL procedure successfully completed.
因为是第一次插入所以显示是No,可以忽略该问题继续插入
插入no-cdb to cdb库
SQL> CREATE PLUGGABLE DATABASE ora11g USING '/tmp/ora11g.xml' NOCOPY;

Pluggable database created.

SQL> show pdbs

    CON_ID CON_NAME                       OPEN MODE  RESTRICTED
---------- ------------------------------ ---------- ----------
         2 PDB$SEED                       READ ONLY  NO
         3 PDB1                           MOUNTED
         4 PDB2                           MOUNTED
         5 ORA11G                         MOUNTED
根据官方文档描述,如果是第一次是no-cdb plug cdb,需要先open一次库
SQL> alter session set container=ora11g;

Session altered.

SQL> alter database open;
alter database open
*
ERROR at line 1:
ORA-24344: success with compilation error


SQL> !oerr ora 24344
24344, 00000, "success with compilation error"
// *Cause:  A sql/plsql compilation error occurred.
// *Action: Return OCI_SUCCESS_WITH_INFO along with the error code

SQL> show pdbs;

    CON_ID CON_NAME                       OPEN MODE  RESTRICTED
---------- ------------------------------ ---------- ----------
         5 ORA11G                         READ WRITE YES
出现ORA-24344,但是数据库正常open到read write模式,忽略该错误,继续执行
执行noncdb_to_pdb脚本
SQL> alter session set container=ora11g;

Session altered.

SQL> shutdown immediate
Pluggable Database closed.
SQL> @$ORACLE_HOME/rdbms/admin/noncdb_to_pdb.sql


--遇到Warning,脚本自动忽略该错误,继续执行,在最后该脚本编译的时候会修复该问题,原因很可能是某个plslq异常
SQL> alter pluggable database "&pdbname" open restricted;
old   1: alter pluggable database "&pdbname" open restricted
new   1: alter pluggable database "ORA11G" open restricted

Warning: PDB altered with errors.
同步pdb信息
[oracle@xifenfei ~]$ sqlplus sys/xifenfei@ora11g as sysdba

SQL*Plus: Release 12.1.0.1.0 Production on Mon Jul 1 03:05:42 2013

Copyright (c) 1982, 2013, Oracle.  All rights reserved.


Connected to:
Oracle Database 12c Enterprise Edition Release 12.1.0.1.0 - 64bit Production
With the Partitioning, Real Application Clusters, Automatic Storage Management, OLAP,
Advanced Analytics and Real Application Testing options

SYS% ora11g> alter pluggable database open restricted;

Pluggable database altered.

SYS% ora11g>  exec dbms_pdb.sync_pdb();

PL/SQL procedure successfully completed.

SYS% ora11g> alter pluggable database close immediate;

Pluggable database altered.

SYS% ora11g> alter pluggable database open;

Pluggable database altered.
确定no-cdb plug cdb 成功
SYS% ora11g> conn / as sysdba
Connected.
SYS% cdb1> show pdbs

    CON_ID CON_NAME                       OPEN MODE  RESTRICTED
---------- ------------------------------ ---------- ----------
         2 PDB$SEED                       READ ONLY  NO
         3 PDB1                           MOUNTED
         4 PDB2                           MOUNTED
         5 ORA11G                         READ WRITE NO
到这里已经完全完成了11.2.0.4数据库插入到12.1.0.1中,实现把11GR2转化为CDB数据库中的一个PDB