近期看到一个awr的报告,里面有较多log buffer space,算是一份比较特殊的awr报告,对它进行了一次分析,因为blog排版问题,使用pdf格式展示
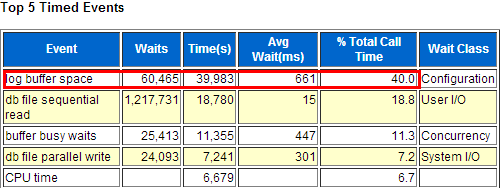
阅读PDF版:记录一次log buffer space等待分析

近期看到一个awr的报告,里面有较多log buffer space,算是一份比较特殊的awr报告,对它进行了一次分析,因为blog排版问题,使用pdf格式展示

阅读PDF版:记录一次log buffer space等待分析
在阅读ORACLE 12C datapump相关文档之时,发现有两个比较欣喜的参数LOGTIME和SQLFILE,鉴于他们是12C新增加参数,对他们的使用方法和用途进行简单说明
LOGTIME参数
该参数可以用于expdp/impdp,主要作用是记录执行步骤的开始时间,精确到微秒,使用语法为
LOGTIME=[NONE | STATUS | LOGFILE | ALL]
• NONE--No timestamps on status or log file messages (same as default)
• STATUS--Timestamps on status messages only
• LOGFILE--Timestamps on log file messages only
• ALL--Timestamps on both status and log file messages
该参数主要在我们对于一些数据库迁移升级项目使用datapump的时候,在测试阶段能够通过该参数发现哪一步执行时间较长,然后对其调优减少执行时间;另外一点就是可以通过做减法精确到具体的时间(毫米),我们可以知道我们的datapump主要耗时在哪一步,做到心中有数不慌
LOGTIME测试
SQL> conn chf/xifenfei@pdb
已连接。

SQL> show pdbs;

    CON_ID CON_NAME                       OPEN MODE  RESTRICTED
---------- ------------------------------ ---------- ----------
         3 PDB                            READ WRITE NO

SQL> create directory temp as 'e:\';

目录已创建。

SQL> create table t_xifenfei as select * from dba_objects;

表已创建。

SQL> create index ind_t_xifenfei on t_xifenfei(object_id);

索引已创建。

C:\Users\XIFENFEI>expdp chf/xifenfei@pdb dumpfile=t_xifenfei.dmp tables=t_xifenf
ei logfile=t_xifenfei.log directory=temp REUSE_DUMPFILES=yes LOGTIME=all

Export: Release 12.1.0.1.0 - Production on 星期日 7月 14 20:11:24 2013

Copyright (c) 1982, 2013, Oracle and/or its affiliates.  All rights reserved.

连接到: Oracle Database 12c Enterprise Edition Release 12.1.0.1.0 - 64bit Production
With the Partitioning, OLAP, Advanced Analytics and Real Application Testing options
14-7月 -13 20:11:35.961: 启动 "CHF"."SYS_EXPORT_TABLE_01":  chf/********@pdb dumpfile=t_xifenfei.dmp
 tables=t_xifenfei logfile=t_xifenfei.log directory=temp REUSE_DUMPFILES=yes LOGTIME=all
14-7月 -13 20:11:37.703: 正在使用 BLOCKS 方法进行估计...
14-7月 -13 20:11:40.636: 处理对象类型 TABLE_EXPORT/TABLE/TABLE_DATA
14-7月 -13 20:11:40.825: 使用 BLOCKS 方法的总估计: 13 MB
14-7月 -13 20:11:48.802: 处理对象类型 TABLE_EXPORT/TABLE/TABLE
14-7月 -13 20:11:54.543: 处理对象类型 TABLE_EXPORT/TABLE/INDEX/INDEX
14-7月 -13 20:11:57.204: 处理对象类型 TABLE_EXPORT/TABLE/INDEX/STATISTICS/INDEX_STATISTICS
14-7月 -13 20:11:59.269: 处理对象类型 TABLE_EXPORT/TABLE/STATISTICS/TABLE_STATISTICS
14-7月 -13 20:11:59.306: 处理对象类型 TABLE_EXPORT/TABLE/STATISTICS/MARKER
14-7月 -13 20:12:36.563: . . 导出了 "CHF"."T_XIFENFEI"  10.36 MB   90865 行
14-7月 -13 20:12:37.527: 已成功加载/卸载了主表 "CHF"."SYS_EXPORT_TABLE_01"
14-7月 -13 20:12:37.533: ******************************************************************************
14-7月 -13 20:12:37.537: CHF.SYS_EXPORT_TABLE_01 的转储文件集为:
14-7月 -13 20:12:37.547:   E:\T_XIFENFEI.DMP
14-7月 -13 20:12:37.577: 作业 "CHF"."SYS_EXPORT_TABLE_01" 已于 星期日 7月 14 20:12:37 2013 elapsed 0 00:01:06 成功完成
SQLFILE参数
该参数可以用于impdp,主要作用是未真实在目标端执行导入的情况下,生成sql文件包含该dmp文件的所有ddl语句,使用语法为
SQLFILE=[directory_object:]file_name
注意事项:
1.directory_object可以不和impdp的DIRECTORY参数不一致,如果是一样,directory_object可以省略
2.SQLFILE文件必须写入到磁盘之上,不能写入到ASM中
3.SQLFILE和QUERY参数冲突,不能同时使用
SQLFILE测试
C:\Users\XIFENFEI>impdp chf/xifenfei@pdb dumpfile=t_xifenfei.dmp tables=t_xifenfei logfile=t_xifenfei.log
 directory=temp  sqlfile=t_xifenfei.sql

Import: Release 12.1.0.1.0 - Production on 星期日 7月 14 20:42:13 2013

Copyright (c) 1982, 2013, Oracle and/or its affiliates.  All rights reserved.

连接到: Oracle Database 12c Enterprise Edition Release 12.1.0.1.0 - 64bit Produc
tion
With the Partitioning, OLAP, Advanced Analytics and Real Application Testing opt
ions
已成功加载/卸载了主表 "CHF"."SYS_SQL_FILE_TABLE_01"
启动 "CHF"."SYS_SQL_FILE_TABLE_01":  chf/********@pdb dumpfile=t_xifenfei.dmp ta
bles=t_xifenfei logfile=t_xifenfei.log directory=temp sqlfile=t_xifenfei.sql
处理对象类型 TABLE_EXPORT/TABLE/TABLE
处理对象类型 TABLE_EXPORT/TABLE/INDEX/INDEX
处理对象类型 TABLE_EXPORT/TABLE/INDEX/STATISTICS/INDEX_STATISTICS
处理对象类型 TABLE_EXPORT/TABLE/STATISTICS/TABLE_STATISTICS
处理对象类型 TABLE_EXPORT/TABLE/STATISTICS/MARKER
作业 "CHF"."SYS_SQL_FILE_TABLE_01" 已于 星期日 7月 14 20:42:25 2013 elapsed 0 00:00:08 成功完成
t_xifenfei.sql内容
-- CONNECT CHF
ALTER SESSION SET EVENTS '10150 TRACE NAME CONTEXT FOREVER, LEVEL 1';
ALTER SESSION SET EVENTS '10904 TRACE NAME CONTEXT FOREVER, LEVEL 1';
ALTER SESSION SET EVENTS '25475 TRACE NAME CONTEXT FOREVER, LEVEL 1';
ALTER SESSION SET EVENTS '10407 TRACE NAME CONTEXT FOREVER, LEVEL 1';
ALTER SESSION SET EVENTS '10851 TRACE NAME CONTEXT FOREVER, LEVEL 1';
ALTER SESSION SET EVENTS '22830 TRACE NAME CONTEXT FOREVER, LEVEL 192 ';
-- new object type path: TABLE_EXPORT/TABLE/TABLE
CREATE TABLE "CHF"."T_XIFENFEI"
   (	"OWNER" VARCHAR2(128 BYTE),
	"OBJECT_NAME" VARCHAR2(128 BYTE),
	"SUBOBJECT_NAME" VARCHAR2(128 BYTE),
	"OBJECT_ID" NUMBER,
	"DATA_OBJECT_ID" NUMBER,
	"OBJECT_TYPE" VARCHAR2(23 BYTE),
	"CREATED" DATE,
	"LAST_DDL_TIME" DATE,
	"TIMESTAMP" VARCHAR2(19 BYTE),
	"STATUS" VARCHAR2(7 BYTE),
	"TEMPORARY" VARCHAR2(1 BYTE),
	"GENERATED" VARCHAR2(1 BYTE),
	"SECONDARY" VARCHAR2(1 BYTE),
	"NAMESPACE" NUMBER,
	"EDITION_NAME" VARCHAR2(128 BYTE),
	"SHARING" VARCHAR2(13 BYTE),
	"EDITIONABLE" VARCHAR2(1 BYTE),
	"ORACLE_MAINTAINED" VARCHAR2(1 BYTE)
   ) SEGMENT CREATION IMMEDIATE
  PCTFREE 10 PCTUSED 40 INITRANS 1 MAXTRANS 255
 NOCOMPRESS LOGGING
  STORAGE(INITIAL 65536 NEXT 1048576 MINEXTENTS 1 MAXEXTENTS 2147483645
  PCTINCREASE 0 FREELISTS 1 FREELIST GROUPS 1
  BUFFER_POOL DEFAULT FLASH_CACHE DEFAULT CELL_FLASH_CACHE DEFAULT)
  TABLESPACE "USERS" ;
-- new object type path: TABLE_EXPORT/TABLE/INDEX/INDEX
CREATE INDEX "CHF"."IND_T_XIFENFEI" ON "CHF"."T_XIFENFEI" ("OBJECT_ID")
  PCTFREE 10 INITRANS 2 MAXTRANS 255
  STORAGE(INITIAL 65536 NEXT 1048576 MINEXTENTS 1 MAXEXTENTS 2147483645
  PCTINCREASE 0 FREELISTS 1 FREELIST GROUPS 1
  BUFFER_POOL DEFAULT FLASH_CACHE DEFAULT CELL_FLASH_CACHE DEFAULT)
  TABLESPACE "USERS" PARALLEL 1 ;

  ALTER INDEX "CHF"."IND_T_XIFENFEI" NOPARALLEL;
-- new object type path: TABLE_EXPORT/TABLE/INDEX/STATISTICS/INDEX_STATISTICS
-- new object type path: TABLE_EXPORT/TABLE/STATISTICS/TABLE_STATISTICS
-- new object type path: TABLE_EXPORT/TABLE/STATISTICS/MARKER
在几个月前写过一篇关于《Enterprise Manager Database Express 12c 欣赏| 惜分飞》,最近在玩该东西的时候,发现ORACLE 12C的Enterprise Manager Database Express 12c相对于11G和10G的Enterprise Manager,从功能上说确实精简了很多,比如不支持在线查看AWR,不支持在线操作不备份,不支持对SCHEDULER的操作等等,减少了功能的同时也大大的降低了其使用难度,不用向以前以前还需要启动dbconsole,需要配置资料库等等一些繁琐的操作,还经常出现一些莫名其妙的问题不得不重建EM。预测几年之后EM Express的使用人说可能会增加(数据库升级到12C是一个因素,有些人毕竟不会购买GC)。在12C的Express版本中,默认情况下只需要在对应的pdb用户下执行如下操作即可启用EM Express
•设置http端口
exec DBMS_XDB_CONFIG.SETHTTPPORT(http_port_number);
•设置https端口
exec DBMS_XDB_CONFIG.SETHTTPSPORT(https_port_number);
注意:Each container must use a unique port for EM Express.
而且该操作是使用xdb组件开启对应端口用来通过浏览器http/https访问EM Express.监听的端口可以通过lsnrctl status查看,开启一个pdb的EM Express操作过程
未开启pdb库的监听状态如下
C:\Users\XIFENFEI>lsnrctl status

LSNRCTL for 64-bit Windows: Version 12.1.0.1.0 – Production on 12-7月 -2013 21:2
2:32

Copyright (c) 1991, 2013, Oracle.  All rights reserved.

正在连接到 (DESCRIPTION=(ADDRESS=(PROTOCOL=TCP)(HOST=XIFENFEI-PC)(PORT=1521)))
LISTENER 的 STATUS
————————
别名                      LISTENER
版本                      TNSLSNR for 64-bit Windows: Version 12.1.0.1.0 – Produ
ction
启动日期                  12-7月 -2013 21:22:08
正常运行时间              0 天 0 小时 0 分 27 秒
跟踪级别                  off
安全性                    ON: Local OS Authentication
SNMP                      OFF
监听程序参数文件          E:\oracle\product\112~1.0\dbhome_1\NETWORK\ADMIN\liste
ner.ora
监听程序日志文件          E:\app\XIFENFEI\diag\tnslsnr\XIFENFEI-PC\listener\aler
t\log.xml
监听端点概要…
  (DESCRIPTION=(ADDRESS=(PROTOCOL=tcp)(HOST=xifenfei-pc)(PORT=1521)))
  (DESCRIPTION=(ADDRESS=(PROTOCOL=ipc)(PIPENAME=\\.\pipe\EXTPROC1521ipc)))
  (DESCRIPTION=(ADDRESS=(PROTOCOL=tcps)(HOST=xifenfei-pc)(PORT=5500))(Security=(
my_wallet_directory=E:\APP\XIFENFEI\admin\cdb\xdb_wallet))(Presentation=HTTP)(Se
ssion=RAW))
服务摘要..
服务 "CLRExtProc" 包含 1 个实例。
  实例 "CLRExtProc", 状态 UNKNOWN, 包含此服务的 3 个处理程序…
服务 "cdb" 包含 1 个实例。
  实例 "cdb", 状态 READY, 包含此服务的 1 个处理程序…
服务 "cdbXDB" 包含 1 个实例。
  实例 "cdb", 状态 READY, 包含此服务的 1 个处理程序…
服务 "pdb" 包含 1 个实例。
  实例 "cdb", 状态 READY, 包含此服务的 1 个处理程序…
命令执行成功
这里我们可以看到开启了一个默认的5500端口的EM Express,是属于root container
开启pdb的EM Expess
C:\Users\XIFENFEI>sqlplus / as sysdba

SQL*Plus: Release 12.1.0.1.0 Production on 星期五 7月 12 21:50:28 2013

Copyright (c) 1982, 2013, Oracle.  All rights reserved.


连接到:
Oracle Database 12c Enterprise Edition Release 12.1.0.1.0 - 64bit Production
With the Partitioning, OLAP, Advanced Analytics and Real Application Testing opt
ions

SQL> show pdbs;

    CON_ID CON_NAME                       OPEN MODE  RESTRICTED
---------- ------------------------------ ---------- ----------
         2 PDB$SEED                       READ ONLY  NO
         3 PDB                            READ WRITE NO
SQL> alter session set container=pdb;

会话已更改。

SQL> exec DBMS_XDB_CONFIG.SETHTTPPORT(5505);

PL/SQL 过程已成功完成。
C:\Users\XIFENFEI>lsnrctl status

LSNRCTL for 64-bit Windows: Version 12.1.0.1.0 - Production on 12-7月 -2013 21:5
1:40

Copyright (c) 1991, 2013, Oracle.  All rights reserved.

正在连接到 (DESCRIPTION=(ADDRESS=(PROTOCOL=TCP)(HOST=XIFENFEI-PC)(PORT=1521)))
LISTENER 的 STATUS
------------------------
别名                      LISTENER
版本                      TNSLSNR for 64-bit Windows: Version 12.1.0.1.0 - Produ
ction
启动日期                  12-7月 -2013 21:22:08
正常运行时间              0 天 0 小时 29 分 35 秒
跟踪级别                  off
安全性                    ON: Local OS Authentication
SNMP                      OFF
监听程序参数文件          E:\oracle\product\112~1.0\dbhome_1\NETWORK\ADMIN\liste
ner.ora
监听程序日志文件          E:\app\XIFENFEI\diag\tnslsnr\XIFENFEI-PC\listener\aler
t\log.xml
监听端点概要...
  (DESCRIPTION=(ADDRESS=(PROTOCOL=tcp)(HOST=xifenfei-pc)(PORT=1521)))
  (DESCRIPTION=(ADDRESS=(PROTOCOL=ipc)(PIPENAME=\\.\pipe\EXTPROC1521ipc)))
  (DESCRIPTION=(ADDRESS=(PROTOCOL=tcps)(HOST=xifenfei-pc)(PORT=5500))(Security=(
my_wallet_directory=E:\APP\XIFENFEI\admin\cdb\xdb_wallet))(Presentation=HTTP)(Se
ssion=RAW))
  (DESCRIPTION=(ADDRESS=(PROTOCOL=tcp)(HOST=xifenfei-pc)(PORT=5505))(Presentatio
n=HTTP)(Session=RAW))
服务摘要..
服务 "CLRExtProc" 包含 1 个实例。
  实例 "CLRExtProc", 状态 UNKNOWN, 包含此服务的 3 个处理程序...
服务 "cdb" 包含 1 个实例。
  实例 "cdb", 状态 READY, 包含此服务的 1 个处理程序...
服务 "cdbXDB" 包含 1 个实例。
  实例 "cdb", 状态 READY, 包含此服务的 1 个处理程序...
服务 "pdb" 包含 1 个实例。
  实例 "cdb", 状态 READY, 包含此服务的 1 个处理程序...
命令执行成功
这里可以看到监听中多了一个监听端口5505,是给pdb的EM Epress使用
EM Express大概功能截图
root container

pdb container
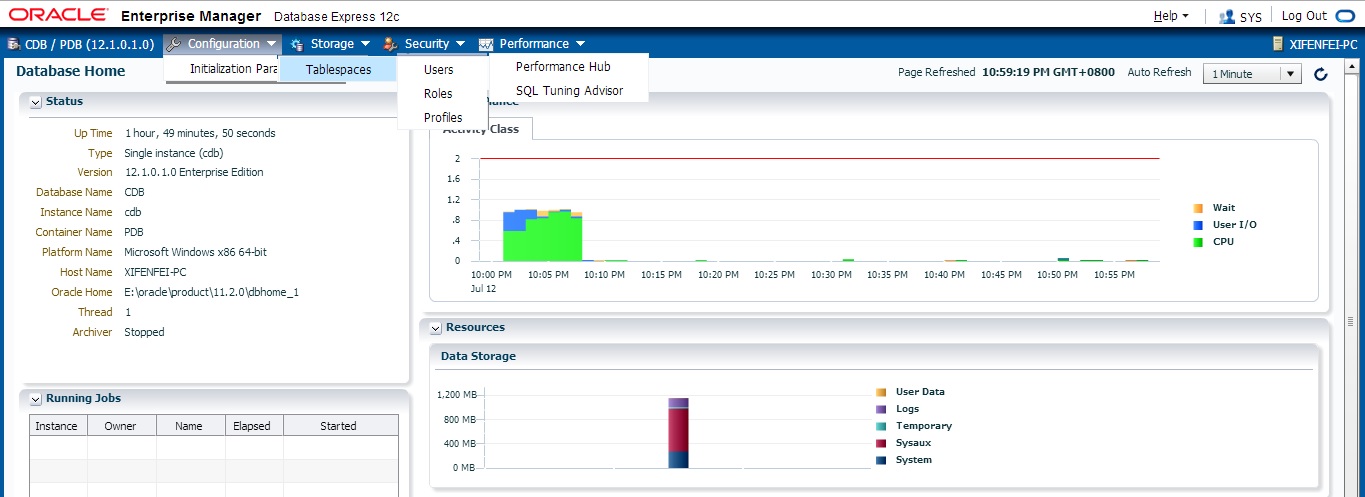
这里需要注意cdb级别的东西直接在root container就查看,涉及到pdb container级别的东西,需要登录到具体pdb的EM Express,例如查看表空间数据文件只能在pdb级别看,redo/controlfile等信息可以在cdb级别看
关闭EM Express
SQL> alter session set container=pdb;

会话已更改。

SQL> exec DBMS_XDB_CONFIG.SETHTTPPORT(0);

PL/SQL 过程已成功完成。

SQL> exit
从 Oracle Database 12c Enterprise Edition Release 12.1.0.1.0 - 64bit Production
With the Partitioning, OLAP, Advanced Analytics and Real Application Testing opt
ions 断开
C:\Users\XIFENFEI>lsnrctl status

LSNRCTL for 64-bit Windows: Version 12.1.0.1.0 - Production on 12-7月 -2013 23:3
8:30

Copyright (c) 1991, 2013, Oracle.  All rights reserved.

正在连接到 (DESCRIPTION=(ADDRESS=(PROTOCOL=TCP)(HOST=XIFENFEI-PC)(PORT=1521)))
LISTENER 的 STATUS
------------------------
别名                      LISTENER
版本                      TNSLSNR for 64-bit Windows: Version 12.1.0.1.0 - Produ
ction
启动日期                  12-7月 -2013 21:22:08
正常运行时间              0 天 2 小时 16 分 25 秒
跟踪级别                  off
安全性                    ON: Local OS Authentication
SNMP                      OFF
监听程序参数文件          E:\oracle\product\112~1.0\dbhome_1\NETWORK\ADMIN\liste
ner.ora
监听程序日志文件          E:\app\XIFENFEI\diag\tnslsnr\XIFENFEI-PC\listener\aler
t\log.xml
监听端点概要...
  (DESCRIPTION=(ADDRESS=(PROTOCOL=tcp)(HOST=xifenfei-pc)(PORT=1521)))
  (DESCRIPTION=(ADDRESS=(PROTOCOL=ipc)(PIPENAME=\\.\pipe\EXTPROC1521ipc)))
  (DESCRIPTION=(ADDRESS=(PROTOCOL=tcps)(HOST=xifenfei-pc)(PORT=5500))(Security=(
my_wallet_directory=E:\APP\XIFENFEI\admin\cdb\xdb_wallet))(Presentation=HTTP)(Se
ssion=RAW))
服务摘要..
服务 "CLRExtProc" 包含 1 个实例。
  实例 "CLRExtProc", 状态 UNKNOWN, 包含此服务的 3 个处理程序...
服务 "cdb" 包含 1 个实例。
  实例 "cdb", 状态 READY, 包含此服务的 1 个处理程序...
服务 "cdbXDB" 包含 1 个实例。
  实例 "cdb", 状态 READY, 包含此服务的 1 个处理程序...
服务 "pdb" 包含 1 个实例。
  实例 "cdb", 状态 READY, 包含此服务的 1 个处理程序...
命令执行成功
已经没有了对pdb监控的5505端口,证明关闭pdb的EM Express成功
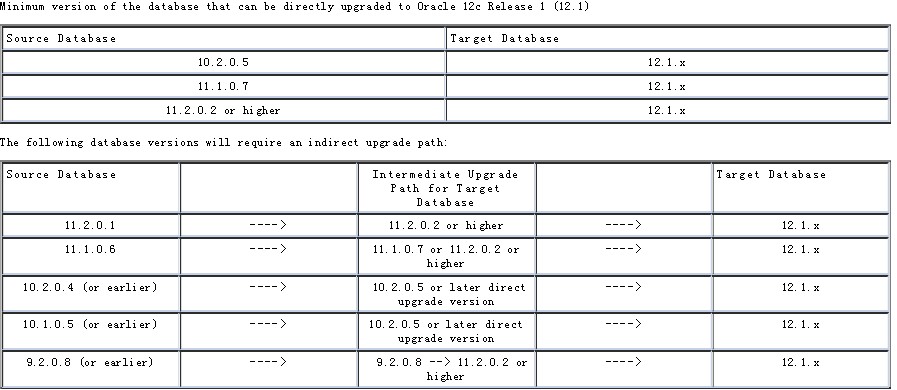
ORACLE 12C已经发布了十多天,其中一个亮点就是pdb,而在12C之前的数据库没有pdb之说,也就是说如果要把以前的数据库升级到12C,并且想让该库变成一个pdb,那所要做的工作就是先需要升级数据库从12C之前版本升级到12C,然后把一个NO-CDB数据库PLUG到CDB中.本blog演示:在前段时间意外的释放出来ORACLE 11.2.0.4版本,利用该版本升级到12.1.0.1,并插入到一个cdb库中
ORACLE 12C升级版本要求
11.2.0.4到12.1.0.1升级操作操作[升级整体参考文档1503653.1]
当前相关组件版本信息
SQL> select * from v$version;

BANNER
--------------------------------------------------------------------------------
Oracle Database 11g Enterprise Edition Release 11.2.0.4.0 - 64bit Production
PL/SQL Release 11.2.0.4.0 - Production
CORE    11.2.0.4.0      Production
TNS for Linux: Version 11.2.0.4.0 - Production
NLSRTL Version 11.2.0.4.0 - Production

SQL> show parameter name;

NAME                                 TYPE        VALUE
------------------------------------ ----------- ------------------------------
cell_offloadgroup_name               string
db_file_name_convert                 string
db_name                              string      ora11g
db_unique_name                       string      ora11g
global_names                         boolean     FALSE
instance_name                        string      ora11g
lock_name_space                      string
log_file_name_convert                string
processor_group_name                 string
service_names                        string      ora11g

SQL> select COMP_NAME,VERSION,STATUS from dba_registry;

COMP_NAME                                VERSION                        STATUS
---------------------------------------- ------------------------------ ----------------------
OWB                                      11.2.0.4.0                     VALID
Oracle Application Express               3.2.1.00.12                    VALID
Spatial                                  11.2.0.4.0                     VALID
Oracle Multimedia                        11.2.0.4.0                     VALID
Oracle XML Database                      11.2.0.4.0                     VALID
Oracle Text                              11.2.0.4.0                     VALID
Oracle Expression Filter                 11.2.0.4.0                     VALID
Oracle Rules Manager                     11.2.0.4.0                     VALID
Oracle Workspace Manager                 11.2.0.4.0                     VALID
Oracle Database Catalog Views            11.2.0.4.0                     VALID
Oracle Database Packages and Types       11.2.0.4.0                     VALID
JServer JAVA Virtual Machine             11.2.0.4.0                     VALID
Oracle XDK                               11.2.0.4.0                     VALID
Oracle Database Java Packages            11.2.0.4.0                     VALID
OLAP Analytic Workspace                  11.2.0.4.0                     VALID
Oracle OLAP API                          11.2.0.4.0                     VALID

16 rows selected.
升级准备工作
执行Pre-Upgrade Utility,具体参考Note 884522.1 How to Download and Run Oracle’s Database Pre-Upgrade Utility
SQL> @/tmp/preupgrd.sql
Loading Pre-Upgrade Package...
Executing Pre-Upgrade Checks...
Pre-Upgrade Checks Complete.
      ************************************************************

Results of the checks are located at:
 /u02/app/oracle/cfgtoollogs/ora11g/preupgrade/preupgrade.log

Pre-Upgrade Fixup Script (run in source database environment):
 /u02/app/oracle/cfgtoollogs/ora11g/preupgrade/preupgrade_fixups.sql

Post-Upgrade Fixup Script (run shortly after upgrade):
 /u02/app/oracle/cfgtoollogs/ora11g/preupgrade/postupgrade_fixups.sql

      ************************************************************

         Fixup scripts must be reviewed prior to being executed.

      ************************************************************

      ************************************************************
                   ====>> USER ACTION REQUIRED  <<====
      ************************************************************

 The following are *** ERROR LEVEL CONDITIONS *** that must be addressed
                    prior to attempting your upgrade.
            Failure to do so will result in a failed upgrade.

           You MUST resolve the above errors prior to upgrade

      ************************************************************
这里发生了改变,在12C之前版本直接显示需要修改的相关操作,12C把相关操作封装到了preupgrade_fixups.sql脚本,执行该脚本按照提示修复问题.
这里主要以下问题需要解决
ALTER SYSTEM SET PROCESSES=300 SCOPE=SPFILE;
@/u01/app/oracle/product/12.1/db_1/rdbms/admin/emremove.sql
@/u02/app/oracle/product/11.2/db_1/olap/admin/catnoamd.sql
EXECUTE dbms_stats.gather_dictionary_stats;
执行dbupgdiag.sql收集升级前信息
如果有异常核对相应的MOS文章修改,具体见Script to Collect DB Upgrade/Migrate Diagnostic Information (dbupgdiag.sql) [ID 556610.1]
dbua升级数据库
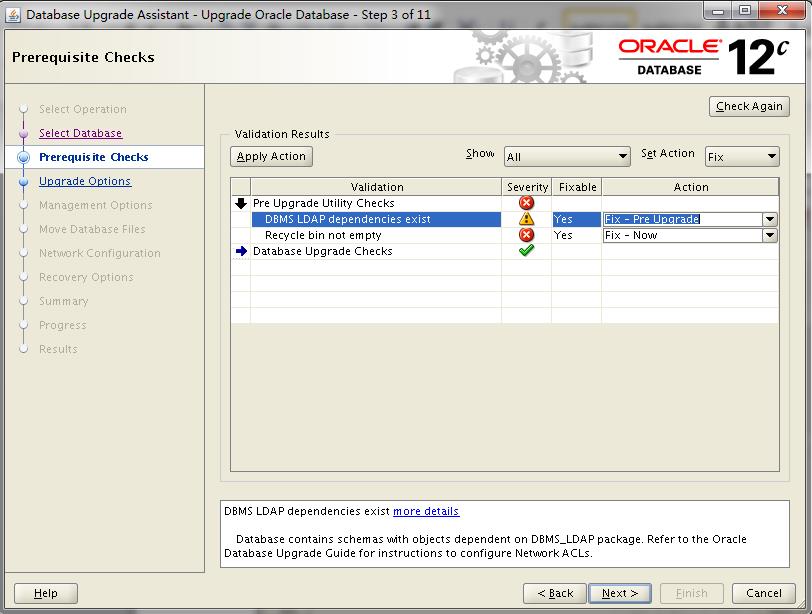
12C的dbua发生了不上变化,因为都是图形化界面,不做过多描述,贴上几幅区别较大图进行说明,关于12C的dbua变化更加详细信息请参考:Complete Checklist to Upgrade the Database to 12c Release 1 using DBUA [ID 1516557.1]
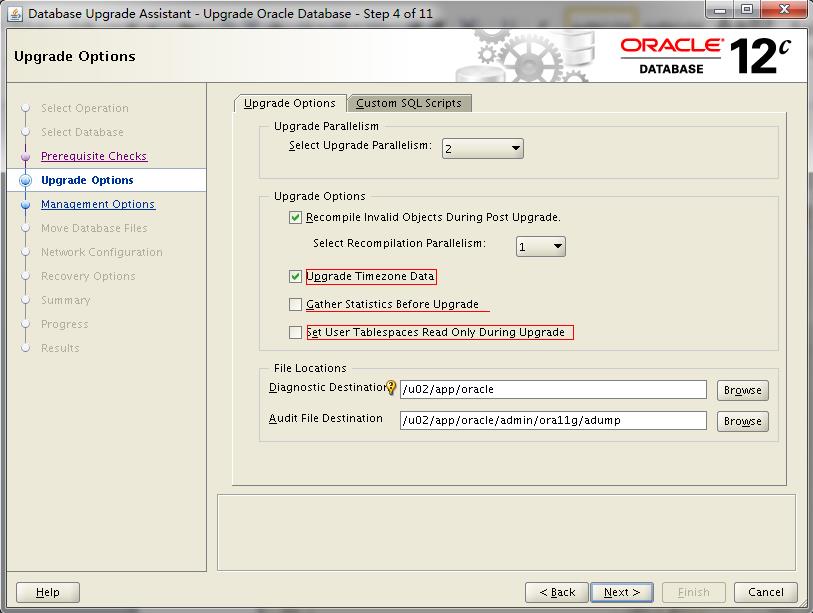
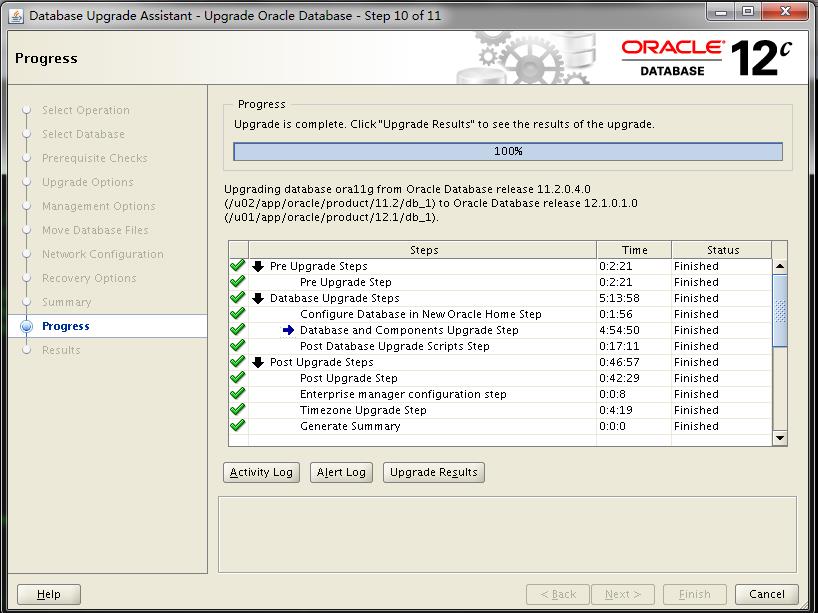
升级后检查
执行postupgrade_fixups.sql脚本查看确定需要升级后处理事宜,因为是dbua升级数据库,很多问题已经自动修复,无需人工再次干预,例如timezone(14–>18)
SQL> select * from v$version;

BANNER                                                                               CON_ID
-------------------------------------------------------------------------------- ----------
Oracle Database 12c Enterprise Edition Release 12.1.0.1.0 - 64bit Production              0
PL/SQL Release 12.1.0.1.0 - Production                                                    0
CORE    12.1.0.1.0      Production                                                        0
TNS for Linux: Version 12.1.0.1.0 - Production                                            0
NLSRTL Version 12.1.0.1.0 - Production                                                    0

SQL> select COMP_NAME,VERSION,STATUS from dba_registry;

COMP_NAME                                     VERSION                        STATUS
--------------------------------------------- ------------------------------ ----------------------
Oracle Application Express                    4.2.0.00.27                    VALID
OWB                                           11.2.0.4.0                     VALID
Spatial                                       12.1.0.1.0                     VALID
Oracle Multimedia                             12.1.0.1.0                     VALID
Oracle XML Database                           12.1.0.1.0                     VALID
Oracle Text                                   12.1.0.1.0                     VALID
Oracle Workspace Manager                      12.1.0.1.0                     VALID
Oracle Database Catalog Views                 12.1.0.1.0                     VALID
Oracle Database Packages and Types            12.1.0.1.0                     VALID
JServer JAVA Virtual Machine                  12.1.0.1.0                     VALID
Oracle XDK                                    12.1.0.1.0                     VALID
Oracle Database Java Packages                 12.1.0.1.0                     VALID
OLAP Analytic Workspace                       12.1.0.1.0                     VALID
Oracle OLAP API                               12.1.0.1.0                     VALID

14 rows selected.
升级前后oratab信息对比
dbua使用12C环境变量shell下执行,注意不要人工修改oratab记录,执行完会自动修改
--升级前
[oracle@xifenfei ~]$ grep ora11g /etc/oratab
ora11g:/u02/app/oracle/product/11.2/db_1:N:             # line added by Agent

--升级后
[oracle@xifenfei ~]$ grep ora11g /etc/oratab
ora11g:/u01/app/oracle/product/12.1/db_1:N:             # line added by Agent
到此,我们可以确定11.2.0.4已经顺利升级到12.1.0.1,升级过程比较顺利,但是升级时间比较长,很可能和我的机器配置有关
NO-CDB PLUG CDB
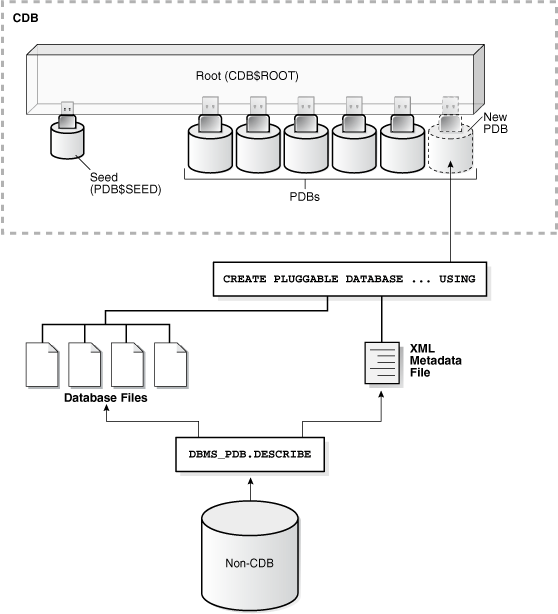
把11.2.0.4升级到12.1.0.1的数据库插入到一个CDB数据库中,让其成为CDB一部分
PLUG操作示意图
升级后数据库信息
SQL>  select cdb,NAME,dbid from v$database;

CDB NAME            DBID
--- --------- ----------
NO  ORA11G    4215674657

SQL> select * from v$version;

BANNER                                                                               CON_ID
-------------------------------------------------------------------------------- ----------
Oracle Database 12c Enterprise Edition Release 12.1.0.1.0 - 64bit Production              0
PL/SQL Release 12.1.0.1.0 - Production                                                    0
CORE    12.1.0.1.0      Production                                                        0
TNS for Linux: Version 12.1.0.1.0 - Production                                            0
NLSRTL Version 12.1.0.1.0 - Production                                                    0
创建XML元数据文件
SQL> shutdown immediate
Database closed.
Database dismounted.
ORACLE instance shut down.
SQL> startup mount;
ORACLE instance started.

Total System Global Area  801701888 bytes
Fixed Size                  2293496 bytes
Variable Size             314573064 bytes
Database Buffers          478150656 bytes
Redo Buffers                6684672 bytes
Database mounted.
SQL> alter database open read only;

Database altered.

SQL> EXEC DBMS_PDB.DESCRIBE( pdb_descr_file => '/tmp/ora11g.xml');

PL/SQL procedure successfully completed.

SQL> shutdown immediate
Database closed.
Database dismounted.
ORACLE instance shut down.
CDB数据库信息
SQL> select * from v$version;

BANNER                                                                               CON_ID
-------------------------------------------------------------------------------- ----------
Oracle Database 12c Enterprise Edition Release 12.1.0.1.0 - 64bit Production              0
PL/SQL Release 12.1.0.1.0 - Production                                                    0
CORE    12.1.0.1.0      Production                                                        0
TNS for Linux: Version 12.1.0.1.0 - Production                                            0
NLSRTL Version 12.1.0.1.0 - Production                                                    0

SQL> show pdbs;

    CON_ID CON_NAME                       OPEN MODE  RESTRICTED
---------- ------------------------------ ---------- ----------
         2 PDB$SEED                       READ ONLY  NO
         3 PDB1                           MOUNTED
         4 PDB2                           MOUNTED
检查升级后数据库是否适合插入到该cdb
SQL> set serveroutput on;
 declare
         compat boolean := FALSE;
    begin
       compat := dbms_pdb.check_plug_compatibility(pdb_descr_file => '/tmp/ora11g.xml');
        if compat
        then
               dbms_output.put_line('Yes');
       else
               dbms_output.put_line('No');
      end if;
   end;SQL>   2    3    4    5    6    7    8    9   10   11
 12  /
No

PL/SQL procedure successfully completed.
因为是第一次插入所以显示是No,可以忽略该问题继续插入
插入no-cdb to cdb库
SQL> CREATE PLUGGABLE DATABASE ora11g USING '/tmp/ora11g.xml' NOCOPY;

Pluggable database created.

SQL> show pdbs

    CON_ID CON_NAME                       OPEN MODE  RESTRICTED
---------- ------------------------------ ---------- ----------
         2 PDB$SEED                       READ ONLY  NO
         3 PDB1                           MOUNTED
         4 PDB2                           MOUNTED
         5 ORA11G                         MOUNTED
根据官方文档描述,如果是第一次是no-cdb plug cdb,需要先open一次库
SQL> alter session set container=ora11g;

Session altered.

SQL> alter database open;
alter database open
*
ERROR at line 1:
ORA-24344: success with compilation error


SQL> !oerr ora 24344
24344, 00000, "success with compilation error"
// *Cause:  A sql/plsql compilation error occurred.
// *Action: Return OCI_SUCCESS_WITH_INFO along with the error code

SQL> show pdbs;

    CON_ID CON_NAME                       OPEN MODE  RESTRICTED
---------- ------------------------------ ---------- ----------
         5 ORA11G                         READ WRITE YES
出现ORA-24344,但是数据库正常open到read write模式,忽略该错误,继续执行
执行noncdb_to_pdb脚本
SQL> alter session set container=ora11g;

Session altered.

SQL> shutdown immediate
Pluggable Database closed.
SQL> @$ORACLE_HOME/rdbms/admin/noncdb_to_pdb.sql


--遇到Warning,脚本自动忽略该错误,继续执行,在最后该脚本编译的时候会修复该问题,原因很可能是某个plslq异常
SQL> alter pluggable database "&pdbname" open restricted;
old   1: alter pluggable database "&pdbname" open restricted
new   1: alter pluggable database "ORA11G" open restricted

Warning: PDB altered with errors.
同步pdb信息
[oracle@xifenfei ~]$ sqlplus sys/xifenfei@ora11g as sysdba

SQL*Plus: Release 12.1.0.1.0 Production on Mon Jul 1 03:05:42 2013

Copyright (c) 1982, 2013, Oracle.  All rights reserved.


Connected to:
Oracle Database 12c Enterprise Edition Release 12.1.0.1.0 - 64bit Production
With the Partitioning, Real Application Clusters, Automatic Storage Management, OLAP,
Advanced Analytics and Real Application Testing options

SYS% ora11g> alter pluggable database open restricted;

Pluggable database altered.

SYS% ora11g>  exec dbms_pdb.sync_pdb();

PL/SQL procedure successfully completed.

SYS% ora11g> alter pluggable database close immediate;

Pluggable database altered.

SYS% ora11g> alter pluggable database open;

Pluggable database altered.
确定no-cdb plug cdb 成功
SYS% ora11g> conn / as sysdba
Connected.
SYS% cdb1> show pdbs

    CON_ID CON_NAME                       OPEN MODE  RESTRICTED
---------- ------------------------------ ---------- ----------
         2 PDB$SEED                       READ ONLY  NO
         3 PDB1                           MOUNTED
         4 PDB2                           MOUNTED
         5 ORA11G                         READ WRITE NO
到这里已经完全完成了11.2.0.4数据库插入到12.1.0.1中,实现把11GR2转化为CDB数据库中的一个PDB
在一些情况下,因为某种原因数据库中的某个数据文件丢失,然后重建控制文件(该文件不存在,重建控制文件肯定不包含该数据文件),这个时候丢失的数据文件所有的归档都存在,尝试alter database create datafile命令创建该数据文件并且利用所有的归档来恢复该数据文件,可是因为控制文件已经重建,无法完成数据文件的重新创建(报ORA-01178错误)
出现这个错误的原因是因为数据文件的创建时间不能早于你的控制文件的创建时间,现在你重建了控制文件,那么很明显你的数据文件的创建时间要早于你的控制文件创建时间,数据库从恢复的原理上判断,你这样做法是违法,终止该操作.解决该问题的主要思路有三个:
1.修改控制文件,让数据库认为你的控制文件创建时间在该数据文件创建之前,通过该欺骗的方法来实现create datafile
2.人工创建好异常数据文件,然后让数据库开始应用归档日志,使得归档的内容能够重现到人工创建的数据文件中,从而找回归档中内容
3.使用logminer挖归档,对应成sql,然后在其他库中重现,此方法只能对于归档比较少的库
因为3比较简单,不做任何操作,因为控制文件结果不是非常了解,修改了N次还是报异常,最后放弃,使用方法2,人工重构文件完成该项工作
模拟环境
SQL> create tablespace ORA01178 DATAFILE 'E:\ORACLE\ORADATA\XIFENFEI\ORA01178.01.DBF'
   2 SIZE 10M AUTOEXTEND ON MAXSIZE 30G;

Tablespace created.

SQL> DROP TABLE T_XIFENFEI;

Table dropped.

SQL> CREATE TABLE T_XIFENFEI TABLESPACE ORA01178
  2  AS
  3  SELECT * FROM DBA_OBJECTS;

Table created.

SQL> ARCHIVE LOG LIST;
Database log mode              Archive Mode
Automatic archival             Enabled
Archive destination            E:\oracle\product\11.2.0\dbhome_1\RDBMS
Oldest online log sequence     123
Next log sequence to archive   125
Current log sequence           125


SQL> ALTER SYSTEM SWITCH LOGFILE;

System altered.

SQL> ALTER SYSTEM SWITCH LOGFILE;

System altered.

SQL> ALTER SYSTEM SWITCH LOGFILE;

System altered.

SQL> ALTER SYSTEM SWITCH LOGFILE;

System altered.

SQL> ARCHIVE LOG LIST;
Database log mode              Archive Mode
Automatic archival             Enabled
Archive destination            E:\oracle\product\11.2.0\dbhome_1\RDBMS
Oldest online log sequence     127
Next log sequence to archive   129
Current log sequence           129

SQL> INSERT INTO T_XIFENFEI
  2  SELECT * FROM DBA_OBJECTS;

68078 rows created.

SQL> /

68078 rows created.

SQL> COMMIT;

Commit complete.

SQL> SELECT BYTES/1024/1024 FROM DBA_SEGMENTS WHERE SEGMENT_NAME='T_XIFENFEI' AND OWNER='SYS';

BYTES/1024/1024
---------------
             24

SQL> select count(*) from t_xifenfei;

  COUNT(*)
----------
    204234


SQL> SHUTDOWN ABORT
ORACLE instance shut down.

SQL> STARTUP NOMOUNT
ORACLE instance started.

Total System Global Area  418484224 bytes
Fixed Size                  1385052 bytes
Variable Size             331353508 bytes
Database Buffers           79691776 bytes
Redo Buffers                6053888 bytes

SQL>  CREATE CONTROLFILE REUSE DATABASE "XIFENFEI" NORESETLOGS  ARCHIVELOG
  2        MAXLOGFILES 16
  3        MAXLOGMEMBERS 3
  4        MAXDATAFILES 100
  5        MAXINSTANCES 8
  6        MAXLOGHISTORY 292
  7    LOGFILE
  8      GROUP 1 'E:\ORACLE\ORADATA\XIFENFEI\REDO01.LOG'  SIZE 50M BLOCKSIZE 512,
  9      GROUP 2 'E:\ORACLE\ORADATA\XIFENFEI\REDO02.LOG'  SIZE 50M BLOCKSIZE 512,
 10      GROUP 3 'E:\ORACLE\ORADATA\XIFENFEI\REDO03.LOG'  SIZE 50M BLOCKSIZE 512
 11    DATAFILE
 12      'E:\ORACLE\ORADATA\XIFENFEI\SYSTEM01.DBF',
 13      'E:\ORACLE\ORADATA\XIFENFEI\SYSAUX01.DBF',
 14      'E:\ORACLE\ORADATA\XIFENFEI\UNDOTBS01.DBF',
 15      'E:\ORACLE\ORADATA\XIFENFEI\USERS01.DBF',
 16      'E:\ORACLE\ORADATA\XIFENFEI\UNDO01.DBF',
 17      'E:\ORACLE\ORADATA\XIFENFEI\CZUM01.DBF',
 18      'E:\ORACLE\ORADATA\XIFENFEI\DUL01.DBF',
 19      'E:\ORACLE\ORADATA\XIFENFEI\DD_DUL.DBF'
 20    CHARACTER SET ZHS16GBK
 21    ;

Control file created.

SQL> ALTER DATABASE OPEN;
ALTER DATABASE OPEN
*
ERROR at line 1:
ORA-01113: file 1 needs media recovery
ORA-01110: data file 1: 'E:\ORACLE\ORADATA\XIFENFEI\SYSTEM01.DBF'


SQL> RECOVER DATABASE;
Media recovery complete.
SQL> ALTER DATABASE OPEN;

Database altered.
尝试创建数据文件,报ORA-01178
SQL> alter database create datafile  9 as 'E:\ORACLE\ORADATA\XIFENFEI\ORA01178.01.DBF'
;
alter database create datafile  9 as 'E:\ORACLE\ORADATA\XIFENFEI\ORA01178.01.DBF'
*
ERROR at line 1:
ORA-01178: file 9 created before last CREATE CONTROLFILE, cannot recreate
ORA-01111: name for data file 9 is unknown - rename to correct file
ORA-01110: data file 9:
'E:\ORACLE\PRODUCT\11.2.0\DBHOME_1\DATABASE\MISSING00009'


[root@vrh2 ~]# oerr ora 1178
01178, 00000, "file %s created before last CREATE CONTROLFILE, cannot recreate"
// *Cause:  Attempted to use ALTER DATABASE CREATE DATAFILE to recreate a
//          datafile that existed at the last CREATE CONTROLFILE command.
//          The information needed to recreate the file was lost with the
//          control file that existed when the file was added to the database.
// *Action: Find a backup of the file, and recover it. Do incomplete recovery
//          to time before file was originally created.
官方提示,因为控制文件的创建时间比你现在要创建的数据文件时间晚,所以不能完成在此数据文件基础之上完成数据文件的创建工作,如果解决该问题,使用备份的数据文件还原或者使用备份的控制文件然后创建数据文件
继续分析该数据文件
SQL> select name from v$datafile where status='RECOVER';

NAME
--------------------------------------------------------------

E:\ORACLE\PRODUCT\11.2.0\DBHOME_1\DATABASE\MISSING00009


SQL> select FILE#,TS# from v$datafile where status='RECOVER';

     FILE#        TS#
---------- ----------
         9          8

SQL> SELECT FILE# from v$datafile where ts#=8;

     FILE#
----------
         9

SQL> select name from v$tablespace where ts#=8;

NAME
------------------------------
ORA01178
--该表空间只有一个数据文件,不好构造数据该数据文件,增加一数据文件,用于构造

--查询数据文件创建信息
SQL> select ts#,file#,RELFILE#,BLOCKS,crscnwrp,crscnbas from file$;

       TS#      FILE#   RELFILE#     BLOCKS   CRSCNWRP   CRSCNBAS
---------- ---------- ---------- ---------- ---------- ----------
         0          1          1      89600          0          9
         1          2          2      76800          0       2130
         2          3          3      25600          0       3333
         4          4          4        640          0      18379
         5          5          5       1280          0     890563
         6          6          6       1280          0     944810
         7          7          7       1280          0    1289586
         7          8          8       1280          0    1848530
         8          9          9       1280          0    1880412

--创建初始化大小相同在相同表空间数据文件
SQL> alter tablespace ora01178 add datafile 'E:\ORACLE\ORADATA\XIFENFEI\DD_1178.02.dbf' size 10m;

Tablespace altered.

SQL> select ts#,file#,RELFILE#,BLOCKS,crscnwrp,crscnbas from file$;

       TS#      FILE#   RELFILE#     BLOCKS   CRSCNWRP   CRSCNBAS
---------- ---------- ---------- ---------- ---------- ----------
         0          1          1      89600          0          9
         1          2          2      76800          0       2130
         2          3          3      25600          0       3333
         4          4          4        640          0      18379
         5          5          5       1280          0     890563
         6          6          6       1280          0     944810
         7          7          7       1280          0    1289586
         7          8          8       1280          0    1848530
         8          9          9       1280          0    1880412
         8         10         10       1280          0    1901583
到目前,我们创建了一个和故障数据文件在同一个表空间,而且同样初始化大小的数据文件
CP新数据文件
E:\ORACLE\ORADATA\XIFENFEI\DD_1178.02.dbf 为E:\oracle\oradata\XIFENFEI\dd_ora1178.02.dbf
bbed修改相关值
因为在win中block 2其实为数据库的block 1,依次类推
m /x 01004002 block 2 offset 4
m /x 09 block 2 offset 52
m /x 5cb11c00 block 2 offset 100
m /x 09 block 2 offset 368
m /x 5cb11c00 offset 484
…………

m /x 02004002 block 3 offset 4
m /x 09 block 3 offset 20
sum apply block 3
…………
online数据文件
SQL> alter database rename file 'E:\ORACLE\PRODUCT\11.2.0\DBHOME_1\DATABASE\MISSING00009'
   2 to 'E:\oracle\oradata\XIFENFEI\dd_ora1178.02.dbf';

Database altered.

SQL> recover datafile 9;
ORA-00279: change 1880412 generated at 07/05/2013 20:59:44 needed for thread 1
ORA-00289: suggestion :
E:\ORACLE\PRODUCT\11.2.0\DBHOME_1\RDBMS\ARC0000000125_0805223583.0001
ORA-00280: change 1880412 for thread 1 is in sequence #125


Specify log: {<RET>=suggested | filename | AUTO | CANCEL}
E:\oracle\product\11.2.0\dbhome_1\RDBMS\archivelog\ARC0000000125_0805223583.0001

ORA-00279: change 1880816 generated at 07/05/2013 11:51:27 needed for thread 1
ORA-00289: suggestion :
E:\ORACLE\PRODUCT\11.2.0\DBHOME_1\RDBMS\ARC0000000126_0805223583.0001
ORA-00280: change 1880816 for thread 1 is in sequence #126


Specify log: {<RET>=suggested | filename | AUTO | CANCEL}
E:\oracle\product\11.2.0\dbhome_1\RDBMS\archivelog\ARC0000000126_0805223583.0001

ORA-00279: change 1880819 generated at 07/05/2013 11:51:29 needed for thread 1
ORA-00289: suggestion :
E:\ORACLE\PRODUCT\11.2.0\DBHOME_1\RDBMS\ARC0000000127_0805223583.0001
ORA-00280: change 1880819 for thread 1 is in sequence #127


Specify log: {<RET>=suggested | filename | AUTO | CANCEL}
E:\oracle\product\11.2.0\dbhome_1\RDBMS\archivelog\ARC0000000127_0805223583.0001

ORA-00279: change 1880824 generated at 07/05/2013 11:51:33 needed for thread 1
ORA-00289: suggestion :
E:\ORACLE\PRODUCT\11.2.0\DBHOME_1\RDBMS\ARC0000000128_0805223583.0001
ORA-00280: change 1880824 for thread 1 is in sequence #128


Specify log: {<RET>=suggested | filename | AUTO | CANCEL}
E:\oracle\product\11.2.0\dbhome_1\RDBMS\archivelog\ARC0000000128_0805223583.0001

ORA-00279: change 1880827 generated at 07/05/2013 11:51:34 needed for thread 1
ORA-00289: suggestion :
E:\ORACLE\PRODUCT\11.2.0\DBHOME_1\RDBMS\ARC0000000129_0805223583.0001
ORA-00280: change 1880827 for thread 1 is in sequence #129


Specify log: {<RET>=suggested | filename | AUTO | CANCEL}
E:\oracle\product\11.2.0\dbhome_1\RDBMS\archivelog\ARC0000000129_0805223583.0001

ORA-00279: change 1901078 generated at 07/05/2013 11:57:44 needed for thread 1
ORA-00289: suggestion :
E:\ORACLE\PRODUCT\11.2.0\DBHOME_1\RDBMS\ARC0000000130_0805223583.0001
ORA-00280: change 1901078 for thread 1 is in sequence #130


Specify log: {<RET>=suggested | filename | AUTO | CANCEL}
E:\oracle\product\11.2.0\dbhome_1\RDBMS\archivelog\ARC0000000130_0805223583.0001

Log applied.
Media recovery complete.
SQL> alter database datafile 9 online;

Database altered.

SQL> select count(*) from t_xifenfei;

  COUNT(*)
----------
    204234

SQL> SELECT BYTES/1024/1024 FROM DBA_SEGMENTS WHERE SEGMENT_NAME='T_XIFENFEI' AND OWNER='SYS';

BYTES/1024/1024
---------------
             24
从这里可以完整的看到,人工利用datafile 10,构造了datafile 9,然后应用归档,完美的找回了归档中的内容
 |
|